Clonezilla is one of my favorite backup tools (and that has nothing to do with the fact that it is free!).

It’s a tiny bootable GNU/Linux utility that is designed to be written to a live USB. And once running on the system, it can replicate the system disks onto both local and remote targets (for the latter think AWS S3 buckets — it can directly write to them!).
Unlike most system backup programs, which work by creating comparatively light differential/incremental backups to creative plentiful restore points to roll back the system to, Clonezilla is the kind of tool that you want to have on hand when things go really wrong or when you need to try restore your old operating system on completely new hardware. The only catch is that you need to create backups for those eventualities before you get to that point. And if you want the restores to be as useful to you as possible, you’ll also want to complete the process relatively frequently (just not quite as frequently as your incrementals.)
So what’s so special about it, then?
For one, it’s a disk imaging tool which is designed to achieve bare metal backups. That means that it creates an exact replicas of your computer’s storage on another. It captures the whole system so takes ‘full’ backups. But instead of choosing what files and directories you want to include in a backup set, Clonezilla operates at the hardware level: you can back up specific partitions or entire drives (it supports ext4 as well as FAT32 and NFTS and many more … so is OS-agnostic).
Unlike many backup programs, Clonezilla also runs from a cold system: you’ll boot into it with nothing else running and won’t be able to use your desktop/laptop while it’s executing the backup job.
Because disk imaging tools are designed to back up everything on a system, as we have seen, they aren’t really suitable for creating those frequent restore points that I just mentioned. It would be a needlessly inefficient use of disk space given that much lighter backup methodologies have been developed.
But as a last resort / Swiss Army Knife for when things go wrong, disk imaging platforms (and Acronis True Image is among the best known commercial alternatives) are still widely used and in a class of their own.
And incidentally it’s not all bad news when comparing image replication to lighter backup approaches.
The fact that it is a full disk backup actually gives it one advantage over lighter differential and incremental backups. Incremental backups form a chain since the first backup and — in many backup systems — a restore is dependent upon all those incremental slices being good (uncorrupted) data, which is not always the case. With a full disk backup — you just restore from one archive and that data chunk is not dependent on any other one.
For the reasons outlined above, many companies use a combination of incremental backups for day-to-day data protection and less frequent full disk imaging
In the pre-Synology era, I kept a separate backup SSD on my computer just for holding my Clonezilla images. Alongside Timeshift (rsync-based, incremental) these two backups were my onsite backup sources. When my DS920+ arrived from Synology last week I made it my priority to start backing up onto the NAS rather than internal drives.
And here’s how I managed to get Clonezilla backups onto the NAS.
How To Take a Clonezilla Backup over the LAN
(Images from the Clonezilla website.)
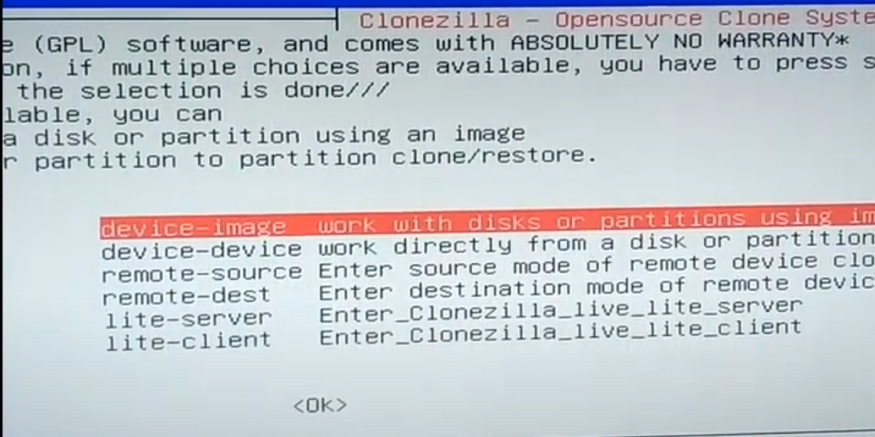
1. Select the backup methodology and enable the right file services
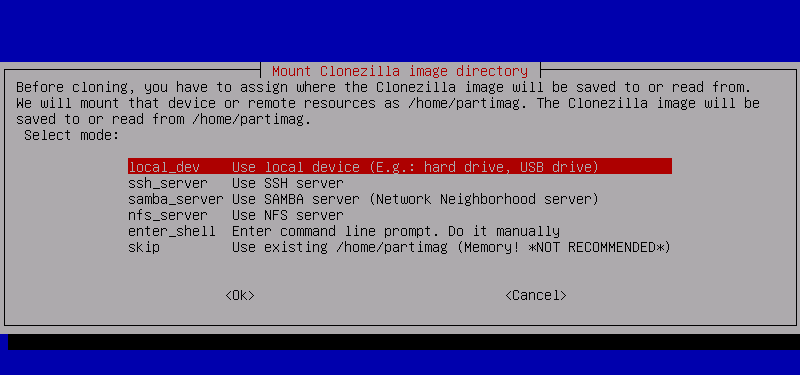
After booting into Clonezilla, when you reach the screen asking you where to mount the Clonezilla image directory you want to select ‘SSH server.’
Note:
You can also create the backup to the Synology NAS over Samba or NFS. However all of these options — including SSH — need to first be enabled on the device via DSM.
In order to do that, navigate to ‘File Services’ in the Control Panel.

Then you will need to enable the service you wish to use for backing up (or saving) to the device over the Local Area Network (LAN):

2. Create a shared folder for the backup
Next, I recommend creating a shared folder on the network simply called ‘Clonezilla’

As we will see in the next step, your target needs to be a real directory on the NAS in order for Clonezilla to authenticate with it.
3. Change mount path to the shared folder
Firstly, you’ll need to provide the local IP address of the NAS / server and then provide login credentials.
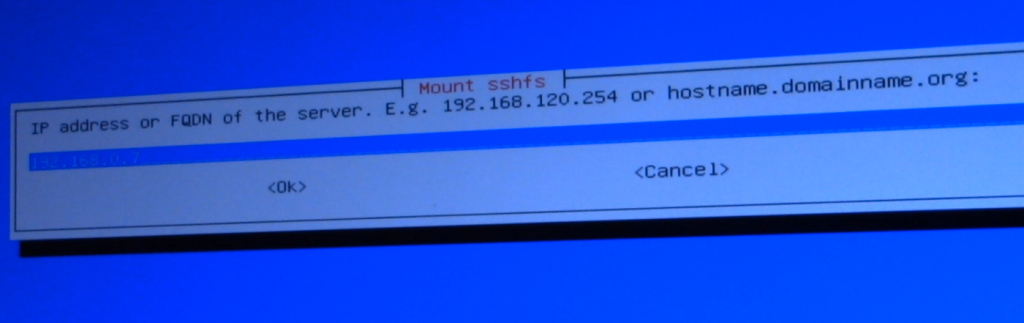
Clonezilla will then need to know where to mount for saving the backup on the target.
By default this is set to /home/partimag.

The problem is that this path almost certainly doesn’t exist on your target. So you need to set it to one that does.
As we just created Clonezilla we can simply change the path to /Clonezilla.
In other words change the dialog to one leading slash followed by the the volume name.
The full syntax is :
[email protected]:/[SharedVolume]
This is very important.
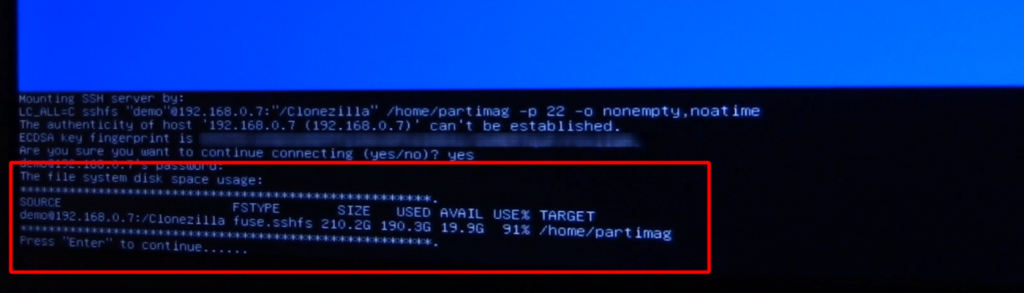
If you do not do this — and leave the default option unchanged — in many cases Clonezilla will fail to complete its authentication check with the NAS and you won’t be able to run the disk cloning job. It took me about five failed attempts to run this backup before I realized that this was the problem!
4. Approve the backup job
If you get to a screen like — in which the NAS or server sends the terminal its key fingerprint for acceptance — then you can breathe a sigh of relief. Your computer has just demonstrated that it has interfaced with the server/NAS, read some of its hardware information, and is poised to take the next step in the backup process.
After this, make sure that you have your source and target correct, as usual, and proceed to run the backup. Performance might be slightly slower than what you are used to, but the image should saved within the folder name you have created on the NAS/server.
And that’s it: you should now be the proud owner of a heavy but useful full disk image clone of your computer’s operating system.
After navigating into the Clonezilla shared volume, I was able to find the full backup I head taken.

Inside, it looks like this: